Wifi Internet Radio 3 Page


Home                               Craigs Pages                               Heathers Pages


November 2021

I'm always on the lookout for new projects and I wanted to do another Internet Radio project for reason I will describe below. I messed around for a couple of weeks first with using a Raspberry Pi Model 3B for the host and then with a combination of two ESP32's in order to stream Internet Radio to our Bluetooth enabled amplifier. Neither of these approaches worked out because the new release of the Raspberry Pi OS I tried to use had lots of problems interfacing to the LCD screen I wanted to use and I couldn't get the two ESP32's to talk to each other using the i2s interfaces. I needed two ESP32's because one cannot use both the Wifi and Bluetooth subsystems of the ESP32 at the same time. I also concluded it would be difficult doing sample rate conversions between the variable bit rates of the Internet radio stations I would be connecting to and the bit rates required by the Bluetooth A2DP software. I generally want my projects to be fun but after beating my head against the wall for a couple of weeks I decided I needed a different approach.

One of the reasons I wanted a new Internet Radio project is that some Internet radio stations constantly come and go. Because I had hard coded the stations' URLs into my previous project's code I needed to change the code as the various stations came and went. Needless to say this was inconvenient at best.

In looking around the Internet I came across the ESP32Radio project which would suit my needs. This is the most complete and capable Internet radio project I have ever seen. It does much more than I needed it to do so I decided to use it instead of writing my own. This project used an ESP32 and a VS1053 decoder chip to stream Internet radio stations and was wirelessly controlled over the local network by web pages that the ESP32's web server sourced. The feature that cinched it for me, however,  was that all of the Internet radio stations found using the program's Search Page were checked on a daily basis and any stations that failed to respond were excluded from use.

So for this project I didn't have to write any of the software. I only had to decided on the hardware to use and I got to use stuff I had in my stash; a ESP32 VROOM module and an Adafruit Music Maker Featherwing which features a VS1053 decoder chip. I did however design the 3D printed case the project is housed in.


The finished Internet Radio in its custom 3D printed case. I designed in vent slots for air circulation although the components don't seem to get warm.

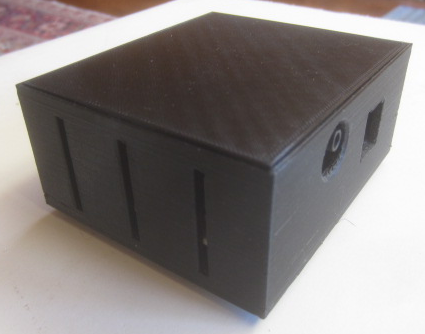
The case is printed in black PETG and took about 4 hours total to print. The lid is just pressed on without the need for any glue. It also pops off easily though I don't think I will need access to the electronics within the case anytime soon.

A quarter gives you an idea of the size of the finished unit.

Here are the connectors to the outside world. There is a stereo 1/8" jack for connection to an amplifier or headphones and a USB connector for programming and power. The USB interface is only used to power the unit once the ESP32 is successfully programmed.

Inside view of the Internet Radio.

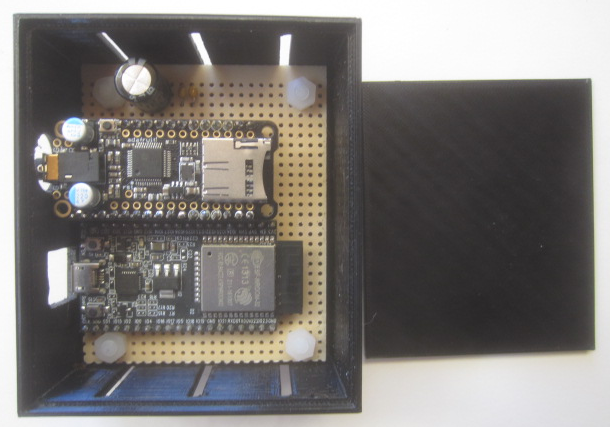
The circuitry consists an ESP32 VROOM32 and an Adafruit Music Player Featherwing and three capacitors used to filter the USB power. The caps may not be necessary but I included them anyway. The ESP32 (~$7) was soldered directly in place whereas the expensive ($20) Featherwing was placed in a socket so I could pull it out easily if I needed it in another project in the future. All components are mounted on a small piece of prefboard with standoffs that secure the breadboard to the case.

Total cost of this project is probably around $50 if all components are purchased new.

Another view of the internals.

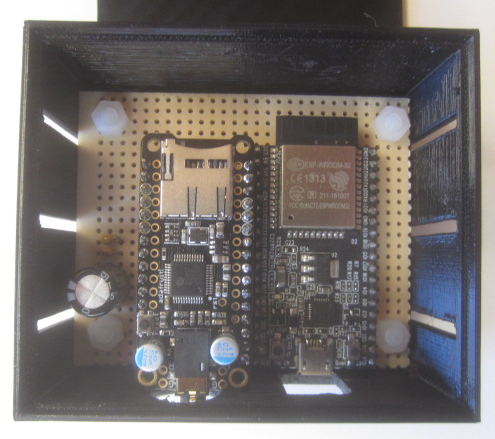
Note, the SD card interface on the Featherwing is currently not being used in this project.

The following are the connections that must be made between the ESP32 and the Featherwing.

ESP32 Pin
Signal
Featherwing
32
xDCS
xDCS
5
CS
CS
4
DREQ
DREQ
18
SCK
SCK
19
MISO
MISO
23
MOSI
MOSI
Gnd
Gnd
GND
3.3V
3.3V
3.3V
EN
RESET
RESET

I connected three capacitors between the Vin signal on the ESP32 and ground for additional power supply filtering. The caps are wired in parallel and are 100uF @ 16 volt, .1 uF and .01 uF. As mentioned, these might not really be required but I used them for piece of mind.

So if you are comfortable soldering these minimal connections you should be able to build this Internet Radio. After you have connected the components together you can power up the device by connecting a USB cable to your computer and bringing up the Arduino Integrated Development Environment or IDE. Please refer to the Internet if you need to find out how to use the Arduino IDE or the configuration necessary to be able to compile ESP32 code.

The following steps are required to configure the Internet Radio for operation.

Step
Procedure
1
Download the program from here
2
Unzip the program
3
Move the complete directory you just unzipped into the Arduino directory on your computer
4
In the esp32_radio_init directory load the  esp32_radio_init  program into the IDE.
5
Edit the lines for wifi_00 and if you have a second WiFi network wifi_01 with the SSID and Passwords for the respective networks. Also change the line pin_vs_dcs to 32.
6
Upload this sketch to the ESP32.
7
From the Tools menu in the IDE, run the ESP32 Sketch Data Upload command to move all of the HTML files in the data subdirectory to the SPIFFS file system on the ESP32.
8
Now load the ESP32Radio-V2-Full.ino into the IDE. Compile and upload it to the ESP32. If you have the Serial Monitor window open you should see the program initialize and run. If you have headphones or an amplifier attached you should hear the default Internet Radio station begin playing. Take note of the IP address assigned to this device.
9
After a moment, point your browser to the address you see on the Serial Monitor and you should see the Control Page (shown below). If you see this page and you hear the default Internet radio station you should be good to go.

The ESP32 provides a web server which serves up the following four pages.


This is the Control Page where you can select any presets you have set, change the volume and change the equalization for the radio stations. Other functions are also available.

This is the Configuration Page where you can select which WiFi to connect to and can change various configuration options. Personally, I don't find this page very useful. What is useful is the Restart button that will cause the ESP32 to reboot if things start to get squirrelly.

This is the Search Page where you can find interesting radio stations to listen to and there are 100's of them from all over the world. Searches are done by genre.

What is interesting is that the ESP32 isn't involved in the station search. The search is performed
(via javascript) in the browser you are using. The site that is being searched for radio stations
tests the stations at least once a day to verify they are still operational.

Internet radio stations seem to come and go all the time so having a facility to test them for you is a good thing.


This is the About Page which describes this program and the people who developed it.

I take no credit for writing this program it was all done by others.


Home                               Craigs Pages                               Heathers Pages