May/June 2017
For some unknown reason I have always wanted to build a Nixie Tube clock and now I finally have. For a long time I looked around for a nice kit but they always cost more than I was willing to pay. While on eBay recently I saw an Arduino Nixie Tube Shield for a reasonable cost so I decide the time to build a Nixie Tube Clock was now. This is a fully assembled and tested shield which was meant for connection to an Arduino Uno. It had all the required hardware like a high voltage power supply for the tubes, a real time clock chip with battery backup and the switches necessary to set the time and date. I decided to get the clock working and then decide how to package it.
I, however, have had my fill of clocks that require any kind of ongoing maintenance like setting the time and changing the time for Daylight Savings Time (DST). Each time DST occurs I have to go around my home and change the time on all of the clocks and then do the same for my cars. No more. Any clocks I build going forward will perform these tasks automatically.
To this end, I decided to use an ESP8266 (a NodeMCU Amica module actually) in place of the Arduino Uno this shield was designed for. This would give my clock access to the Internet as the ESP8266 has built in WiFi capabilities. With Internet access my clock could get the time by polling Network Time Protocol (NTP) servers on the Internet. This is the same technique personal computers use to set their time. From NTP time the clock could calculate the current date so my Nixie Tube clock would always display accurate time and date information. Going further my software incorporates a TimeZone library that understands DST changes so my clock automatically adjusts for that as well. Perfect, a clock that requires no maintenance on my part.
To gain access to the Internet the ESP8266 must be configured to talk to the local WiFi network. Whereas the SSID and password of the WiFi network could be hardcoded into the clock's software I decided to use the WiFi Manager library which allows the WiFi credentials to be set via a web interface. Use of the WiFi Manager library also means the clock can be moved between WiFi networks without changes to the code being necessary. Here is how it works.
When the program is first started it creates a wireless access point (AP) called NixieClock that the user needs to connect to. Then if the user points his/her browser to 192.168.4.1, a page is presented that allows the credentials for the actual WiFi network to be entered. This only needs to be done once since the credentials will be stored in the ESP8266's EEPROM and will be used from that point forward. If, at some point in the future the ESP8266 cannot connect to the WiFi network using the stored credentials, it will again create the NixieClock access point to allow new WiFi credentials to be entered. Pretty slick if you ask me.
Maybe you should build a Nixie Tube clock of your own. The design incorporates display technology from the past with state of the art modern embedded electronics, a nice combination.
The full construction article and accompanying code are available here.
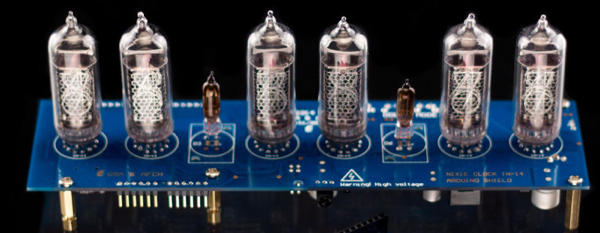 | I bought the Arduino Nixie Tube Shield from gra-afch.com on eBay for about $94 US. It comes fully assembled and tested. It has all of the high voltage circuitry, a RTC chip with backup battery and switches used to set the time and date. It is meant to be used with an Arduino Uno which is not supplied. This is one of the cheapest Nixie Tube clock assemblies I have come across. |
 | To verify that the shield worked I plugged on an Arduino Uno and loaded the code from gra-afch. As expected it worked perfectly. The shield seems to be well constructed with SMT components and uses quality parts. |
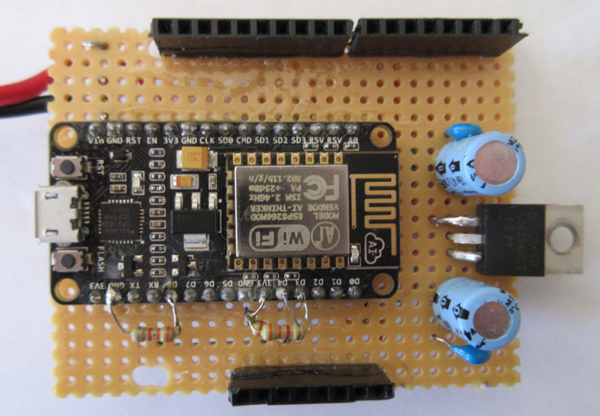 | I wanted to drive my Nixie Tube clock with an NodeMCU Amica module so that I could have a clock that automatically sets its time and date using the NTP protocol over the Internet. The custom software I wrote to accomplish this also knows about daylight saving time and adjusts itself automatically. To accomplish this I built the NodeMCU module onto a small piece of pref board that has the form factor of an Arduino Uno. This allows the NodeMCU module to plug directly onto the Nixie Tube Shield. Of course this meant that I would not be using the RTC chip or any of its support circuitry on the shield itself. I built a voltage regulator onto the pref board to reduce the 12 volt power from the shield down to 5 V for the NodeMCU. This was probably unnecessary but oh well. |
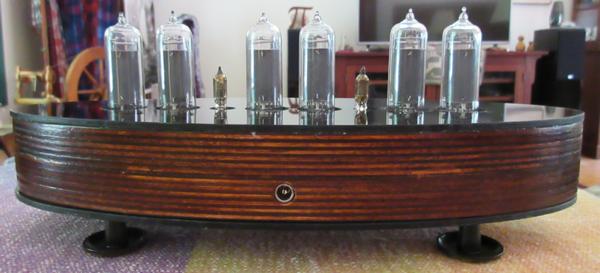
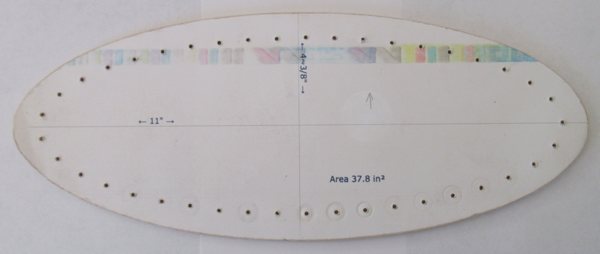 | I did not want to build my state of the art Nixie Tube Clock into a boring rectangular box . I decided instead to build it into an elliptical shape. The process started by printing out an ellipse of the proper size and gluing it to 1/8" mdf. I then cut the mdf to shape and drilled a series of holes equal distant from the edge. This became a template for my router. |
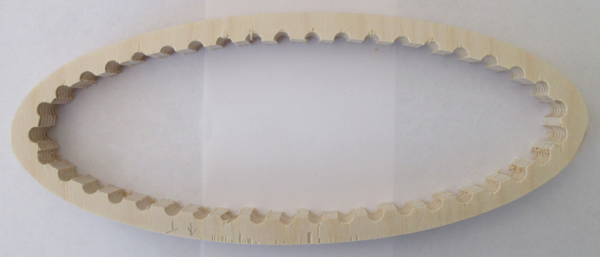 | I attached the template to a piece of 3/4" Baltic Birch using double sided tape and used a flush trim router bit with a bearing to cut the wood to shape. The bearing runs along the template making the router cut out the exact shape. I then drilled all of the hole in the template through the wood and then used a jig saw to saw out the middle of the ellipse. I made two of these that I glued together as the clock's base needed to be about 1 1/2" deep. |
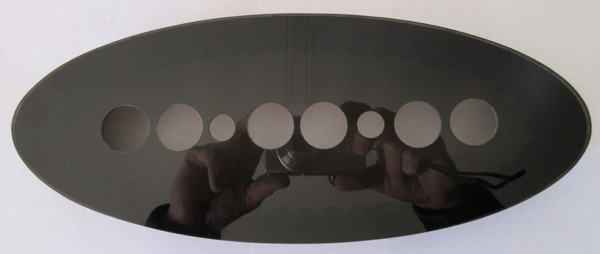 | I again used the template and double sided tape to create the top out of black 1/8" plastic. After carefully measuring the positions of the Nixie Tubes, I drilled holes in the top for the six tubes and the two smaller neon bulbs. I used the template to create the bottom as well out of the same plastic material. |
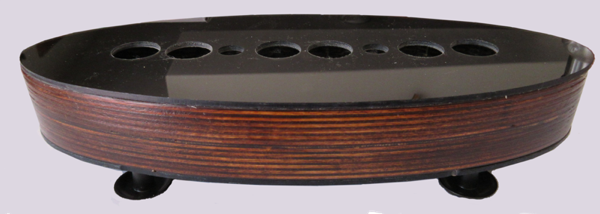 | After gluing the two sections of the chassis together and sanding them to 240 grit I stained them with mahogany stain. I attached four cabinet knobs to the bottom to use as feet to give my clock a modern look. Here I put all of the chassis pieces together to get an idea of how things fit. The bottom screws onto the wooden chassis but there are no exposed screws anywhere else. |
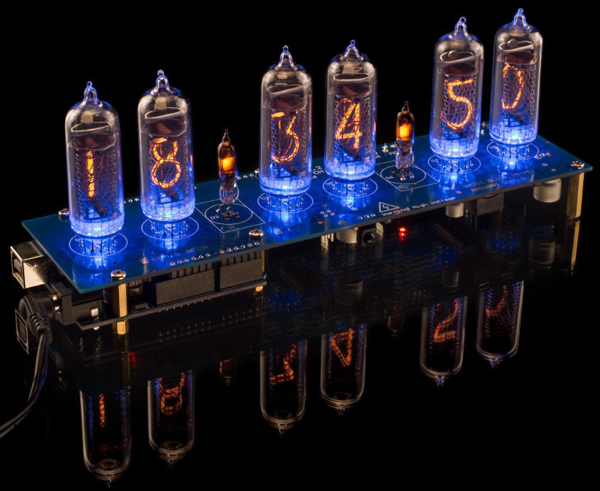
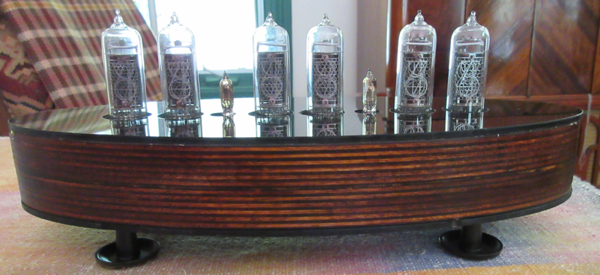 | Here is the finished clock. |
 | Here is the rear view of the clock showing the power connector. Notice there are no switches to set the time or date or to indicate daylight savings time. Setting of the clock is all done automatically. |
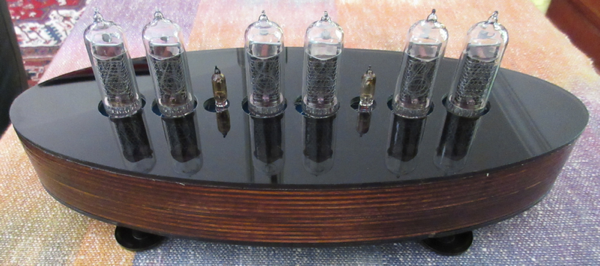 | Another view of the finished clock. |
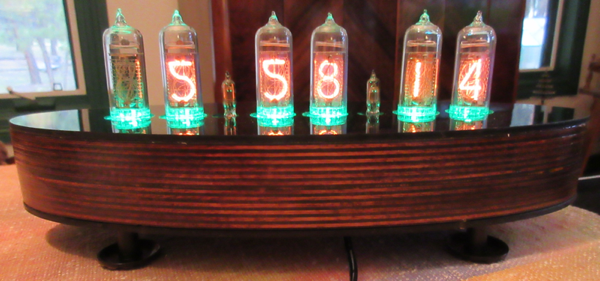 | Here is the clock in operation. My clock runs in 12 hour time and I suppress leading zeros which is why the left most tube is off. The time is 5:58:14. The clock can also run in 24 hour time by making a small change in the software. The lightning at the bottom of the Nixie Tubes is provided by RGB LEDs that are software controllable. Every 10 minutes the clock changes momentarily from the display of time to the display of the date. Every 15 minutes, the clock performs a little light show by running the RGB LEDs through all the colors of the rainbow. At the top of each hour the clock performs what is called the anti-poisoning routine which runs each tube through all the numeric digits. If this is not done periodically, the unused digits will slowly darken. |