May
2023
After seeing a HackADay blog entry on a build of an 8 bit MIDI sequencer by Tod Kurt
(See https://github.com/todbot/picostepseq),
I decided I needed to build one myself. Kurt built his sequencer using an RPi Pico and an I2C display and he published code for both Python and Arduino. I really liked the compact nature of his hardware design so I kind of copied it but used an ESP32 and an SPI display instead. Anyone who follows my electronic exploits knows I like to code in Forth so I used my custom version of ESP32Forth for my sequencer. This meant that I didn't have access to all of the libraries that Kurt used so I had to code up everything from the ground up in ESP32Forth. It turned out to be the largest ESP32Forth program I have ever written but it worked out great. I was wondering whether ESP32Forth would be fast enough to run the sequencer in real time but it turned out performance was not an issue.
It is interesting that absolutely every GPIO pin on the ESP32 VROOM module was used in this design and some were even overloaded. All hardware connections are described in the ESP32Forth file: sequencer_hwd.fth.
The sequencer has three basic modes: Playing, Programming and MIDI configuration. In Playing mode, the currently selected sequence is played sequentially and continuously in a loop. In this mode the tempo of the playback can be changed over a wide range and the whole sequence can be transposed up or down. In the Programming mode, the note/pitch, the gate (duration) and status (whether the step sounds or not) of each each step in the sequence is programmed. After programming a sequence, it is played when Playing mode is engaged again. In MIDI configuration mode, the MIDI channel 1..16, MIDI voice (patch) can be set along with the levels of modulation, reverb, chorus and portamento time.
Sequencer modes are selected by clicking the various switches and buttons which make up the sequencer. There are 8 step switches/button each containing an LED. The rotary encoder also has a switch that is actuated when the shaft of the encoder is pressed. The rotary encoder is turned when setting various values. Each of the switches/buttons (including the rotary encoder switch) can be singly clicked, double clicked or long clicked allowing for a lot of functionality to be associated with each switch/button. The operation of the sequencer is described below.
While in Playing Mode the actions are
To enter Programming mode, long click the rotary encoder.
To transpose a sequence, turn the rotary encoder.
To change tempo, single click the rotary encoder and turn.
Single click the rotary encoder again when done
To load a new sequence click a step key, 0..7
When in Programming Mode the actions are
To return to Playing mode, long click the rotary encoder.
To change step note/pitch, single click a step button and turn rotary encoder. You will hear the pitch change as you turn the encoder.
Single click step button when done
To change the step's gate, double click step button and turn rotary encoder.
Single click step button when done
To change step sounding status, long click step button and turn rotary encoder.
Single click step button when done
To configure MIDI, single click the rotary encoder. This will bring
up the MIDI configuration screen.
MIDI Configuration Mode actions are
To return to programming mode, single click the rotary encoder
To change the MIDI channel, single click Step 0 button and turn rotary encoder.
Single click Step 0 button again when done
To change the MIDI voice/patch, single click Step 1 button and turn rotary encoder.
Single click Step 1 button when done
To change MIDI modulation, single click Step 2 button and turn rotary encoder.
Single click Step 2 button when done
To change MIDI reverb, single click Step 3 button and turn rotary encoder.
Single click Step 3 button when done
To change MIDI chorus, single click Step 4 button and turn rotary encoder.
Single click Step 4 button when done
To change MIDI portamento time, single click Step 5 button and turn rotary encoder.
Single click Step 5 button when done
On startup, sequences are loaded into memory
On transition from Programming mode to Playing mode, all sequences are saved
The Hardware
The Software
Files listed in no particular order
Click here to
view my ESP32Forth development tree/workspace which contains
code for this project along with a bunch of other ESP32Forth
projects.After seeing a HackADay blog entry on a build of an 8 bit MIDI sequencer by Tod Kurt
(See https://github.com/todbot/picostepseq),
I decided I needed to build one myself. Kurt built his sequencer using an RPi Pico and an I2C display and he published code for both Python and Arduino. I really liked the compact nature of his hardware design so I kind of copied it but used an ESP32 and an SPI display instead. Anyone who follows my electronic exploits knows I like to code in Forth so I used my custom version of ESP32Forth for my sequencer. This meant that I didn't have access to all of the libraries that Kurt used so I had to code up everything from the ground up in ESP32Forth. It turned out to be the largest ESP32Forth program I have ever written but it worked out great. I was wondering whether ESP32Forth would be fast enough to run the sequencer in real time but it turned out performance was not an issue.
It is interesting that absolutely every GPIO pin on the ESP32 VROOM module was used in this design and some were even overloaded. All hardware connections are described in the ESP32Forth file: sequencer_hwd.fth.
The sequencer has three basic modes: Playing, Programming and MIDI configuration. In Playing mode, the currently selected sequence is played sequentially and continuously in a loop. In this mode the tempo of the playback can be changed over a wide range and the whole sequence can be transposed up or down. In the Programming mode, the note/pitch, the gate (duration) and status (whether the step sounds or not) of each each step in the sequence is programmed. After programming a sequence, it is played when Playing mode is engaged again. In MIDI configuration mode, the MIDI channel 1..16, MIDI voice (patch) can be set along with the levels of modulation, reverb, chorus and portamento time.
Sequencer modes are selected by clicking the various switches and buttons which make up the sequencer. There are 8 step switches/button each containing an LED. The rotary encoder also has a switch that is actuated when the shaft of the encoder is pressed. The rotary encoder is turned when setting various values. Each of the switches/buttons (including the rotary encoder switch) can be singly clicked, double clicked or long clicked allowing for a lot of functionality to be associated with each switch/button. The operation of the sequencer is described below.
While in Playing Mode the actions are
To enter Programming mode, long click the rotary encoder.
To transpose a sequence, turn the rotary encoder.
To change tempo, single click the rotary encoder and turn.
Single click the rotary encoder again when done
To load a new sequence click a step key, 0..7
When in Programming Mode the actions are
To return to Playing mode, long click the rotary encoder.
To change step note/pitch, single click a step button and turn rotary encoder. You will hear the pitch change as you turn the encoder.
Single click step button when done
To change the step's gate, double click step button and turn rotary encoder.
Single click step button when done
To change step sounding status, long click step button and turn rotary encoder.
Single click step button when done
To configure MIDI, single click the rotary encoder. This will bring
up the MIDI configuration screen.
MIDI Configuration Mode actions are
To return to programming mode, single click the rotary encoder
To change the MIDI channel, single click Step 0 button and turn rotary encoder.
Single click Step 0 button again when done
To change the MIDI voice/patch, single click Step 1 button and turn rotary encoder.
Single click Step 1 button when done
To change MIDI modulation, single click Step 2 button and turn rotary encoder.
Single click Step 2 button when done
To change MIDI reverb, single click Step 3 button and turn rotary encoder.
Single click Step 3 button when done
To change MIDI chorus, single click Step 4 button and turn rotary encoder.
Single click Step 4 button when done
To change MIDI portamento time, single click Step 5 button and turn rotary encoder.
Single click Step 5 button when done
On startup, sequences are loaded into memory
On transition from Programming mode to Playing mode, all sequences are saved
The Hardware
| Picture |
Description |
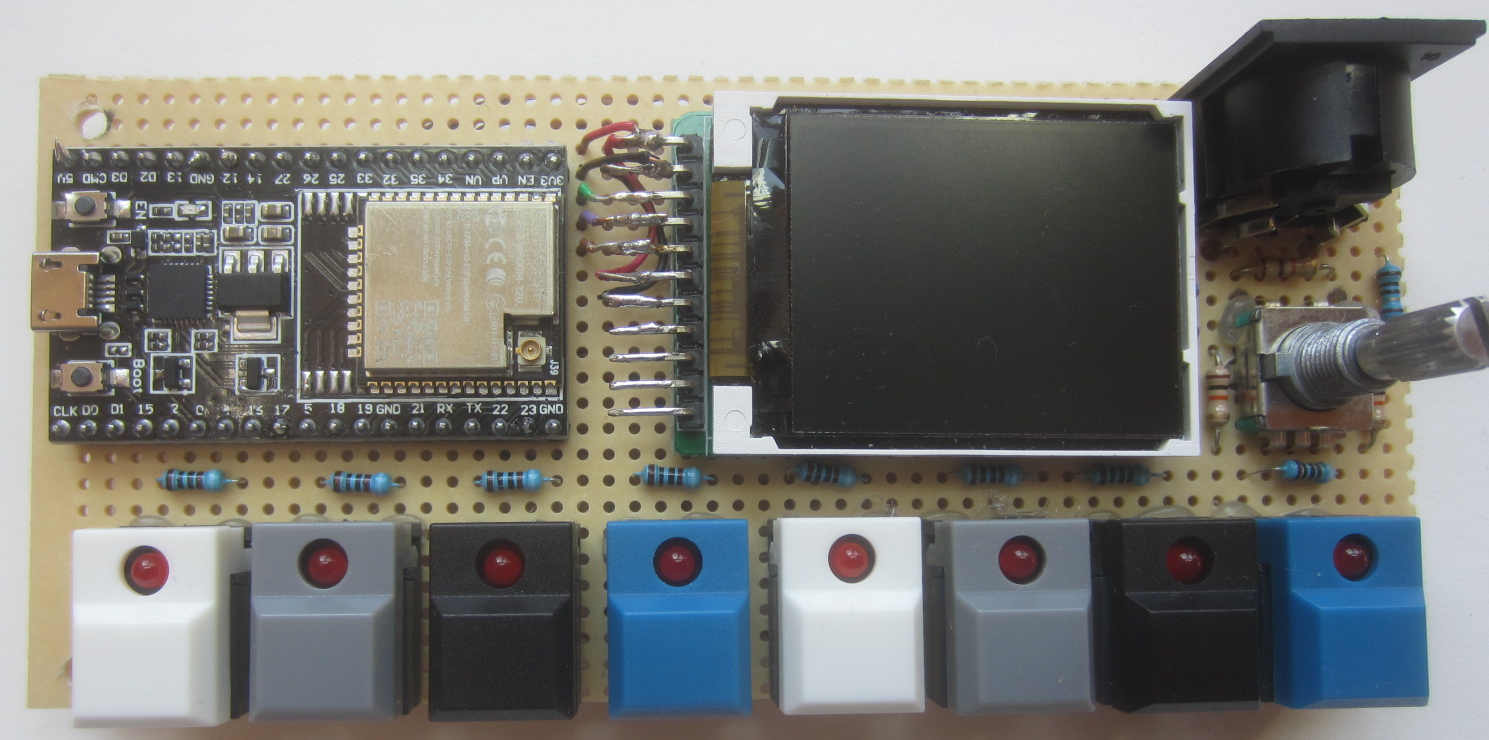 |
Here is the top view of my version of the
sequencer. ESP32 on the left, SPI display in the
middle and the MIDI interface and rotary encoder on
the right. Eight momentary contact switches with
LEDs form the 8 step buttons. |
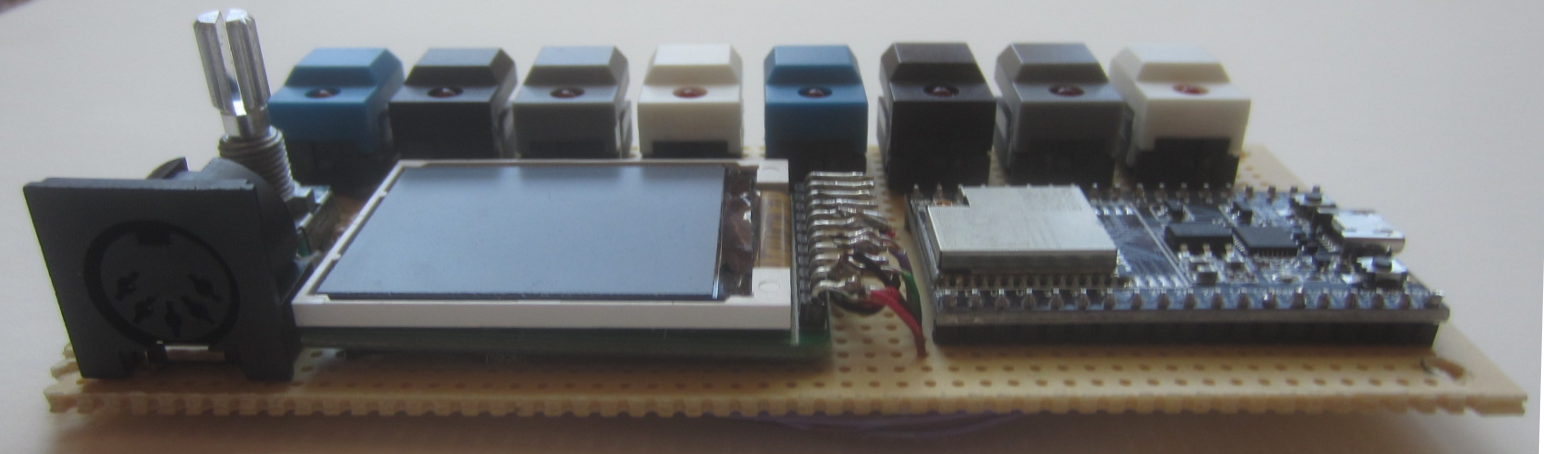 |
Rear view of the hardware. The MIDI DIN
connector is shown on the left. |
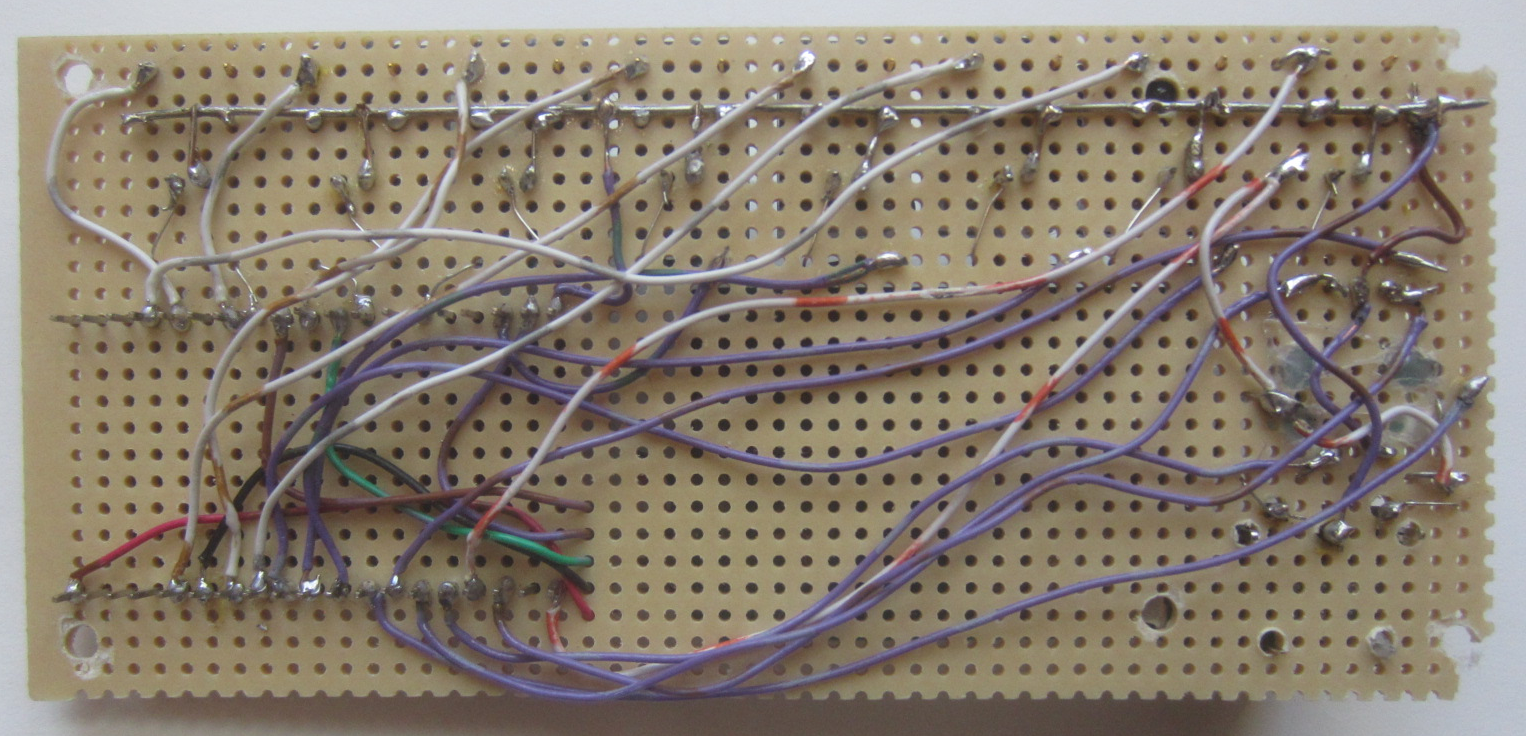 |
Point to point wiring was used to build the
sequencer as I was only planning on building one of
these. |
The Software
Files listed in no particular order
| Code File |
Function |
| Apps/Sequencer/load | This file is a list of files to be compiled into
the sequencer. It contains entries for all of the
files listed in this table. |
| Apps/Sequencer/programmingSequenceUI.fth |
This file contains the code for the user
interface used when programming the sequencer. |
| Apps/Sequencer/runtimeSequenceUI.fth |
This file contains the code for the user
interface used when the sequencer is running. |
| Apps/Sequencer/sequence_storage.fth |
This file contains the code that manages the 8x8
sequences supported by the sequencer. It also has
code for saving and loading all of the sequences
to/from the SPIFFS filesystem. |
| Apps/Sequencer/sequence_hwd.fth |
This file enumerates the electrical connections
between the ESP32's GPIO lines and the display, the
rotary encoder, the MIDI interface and all of the
switches/buttons used in the sequencer. |
| Apps/Sequencer/sequencer.fth |
This is the top level application code which
runs the sequencer. It has code for initializing the
hardware and a finite state machine which runs the
sequencer. |
| Apps/Sequencer/variables.fth |
This file contains the runtime variables that
control the sequencer's operation. |
| Utils/structures.fth |
Forth code supporting simple C like structures.
This code is used by the multiple click button code
(multi_MCB.fth) in support of multiple instances of
the code used for all switches/buttons. |
| Utils/formatbuffer.fth |
Code for string manipulation allowing
characters, text and numbers to be concatenated
together. Used to format strings for the sequencer
UI. |
| Utils/stringtable.fth |
Code for building large tables of strings. This
is used for storing the 127 different MIDI voice
strings used in the UI. |
| Drivers/ST7735.fth |
An SPI display driver for the ST7735 display
controller. Display resolution is 128x160 pixels. |
| Graphics/Font5x7.fth |
Font used exclusively by the sequencer |
| Graphics/text.fth |
This file provides all of the functions for
writing text using the 5x7 font to the SPI display. |
| Drivers/rotaryencoder2.fth |
This is the driver for the rotary encoder. It
utilizes a finite state machine for tracking forward
and backward rotations of the rotary encoder. |
| Drivers/multi_MCB.fth |
This code runs a finite state machine that
determines if a switch/button is single, double or
long clicked giving each switch/button lots of
functionality. |
| Drivers/midi.fth |
This MIDI driver uses Serial2 of the ESP32 for
the MIDI serial interface. This simple drivers
provides Forth words for sending MIDI messages to an
attached synthesizer. |
NOTE: *** The sequencer code is currently only at beta level so check back later for updates ***
Questions and comments to me Craig at: calhjh@gmail.com