October,
November 2023
A cute, laser cut mini antique radio cabinet, containing a multi-function music player.
The first time I saw this cabinet on the Internet (Hackaday around 2018) I knew I had to make one at some point. My recent purchase of a laser engraver/cutter now made this possible. It took a while for me to find the model (now available at dqmusicbox.com) for this cabinet but I finally did. I made some modifications to the model like adding an LCD screen cutout then used LightBurn along with my Laser Master 2 to cut the pieces out of 1/8" Baltic Birch. The original model was designed for 7mm material but I thought the 1/8" material would work as well. You can see the tabs stick out from the sides because of this but I thought this added some to the overall aesthetics. I have to say that this project has had many ups and downs to the point I almost scrapped it entirely. Thankfully, I was able to make it work.
Initially I was unsure about the functionality I was going to build in to the cabinet. It could possibly play music from a SD memory card, it might play my personally recorded music from my website or it could become an Internet radio. Turns out I made it do all of the above.
I wanted to build the hardware out of parts I had on hand. This consisted of an ESP32 VROOM module (which supports both WiFi and Bluetooth), a small SPI LCD display (MCUDEV_TFT1.44 Ver. 3.0) containing a ST7735 display controller, an Adafruit VS1053 module with an SD card interface and a couple of rotary encoders. Output from the music player will be via an 1/8" stereo jack and the unit will be powered via USB.
Hardware connections will be described later.
Hardware
ConnectionsA cute, laser cut mini antique radio cabinet, containing a multi-function music player.
The first time I saw this cabinet on the Internet (Hackaday around 2018) I knew I had to make one at some point. My recent purchase of a laser engraver/cutter now made this possible. It took a while for me to find the model (now available at dqmusicbox.com) for this cabinet but I finally did. I made some modifications to the model like adding an LCD screen cutout then used LightBurn along with my Laser Master 2 to cut the pieces out of 1/8" Baltic Birch. The original model was designed for 7mm material but I thought the 1/8" material would work as well. You can see the tabs stick out from the sides because of this but I thought this added some to the overall aesthetics. I have to say that this project has had many ups and downs to the point I almost scrapped it entirely. Thankfully, I was able to make it work.
Initially I was unsure about the functionality I was going to build in to the cabinet. It could possibly play music from a SD memory card, it might play my personally recorded music from my website or it could become an Internet radio. Turns out I made it do all of the above.
I wanted to build the hardware out of parts I had on hand. This consisted of an ESP32 VROOM module (which supports both WiFi and Bluetooth), a small SPI LCD display (MCUDEV_TFT1.44 Ver. 3.0) containing a ST7735 display controller, an Adafruit VS1053 module with an SD card interface and a couple of rotary encoders. Output from the music player will be via an 1/8" stereo jack and the unit will be powered via USB.
Hardware connections will be described later.
| Picture |
Description |
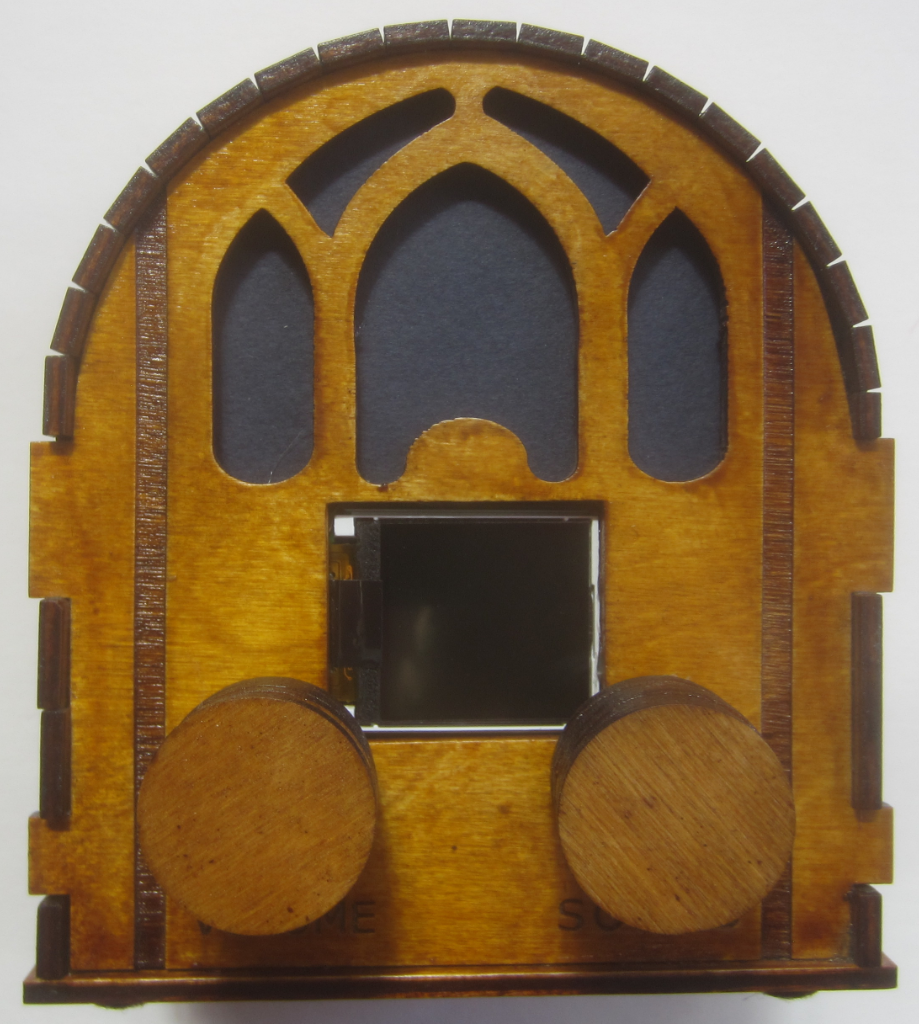 |
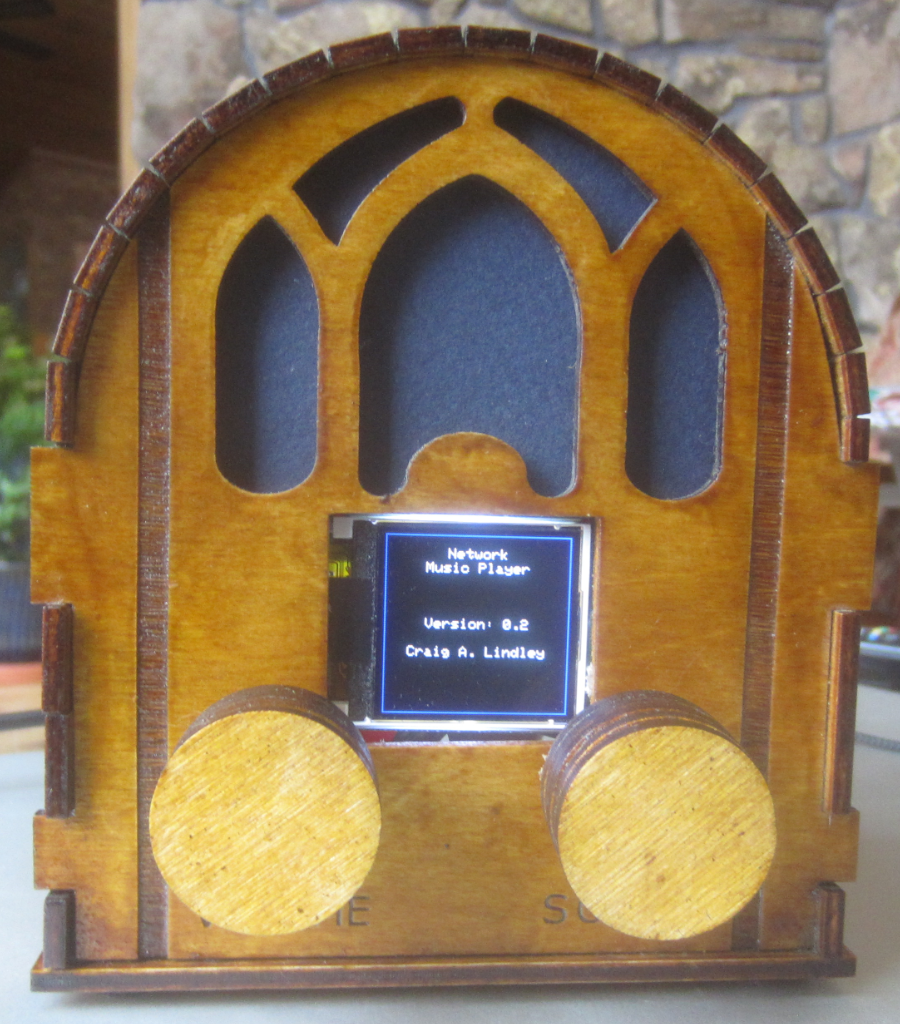
Front view of the finished cabinet with the
LCD screen right in the middle. The two round
objects are laser cut knobs: one for volume and the
other for navigation through the musical content. I think the cabinet turned out great. I painted it with multiple coats of amber shellac to give it an antique look and feel. I think it worked. |
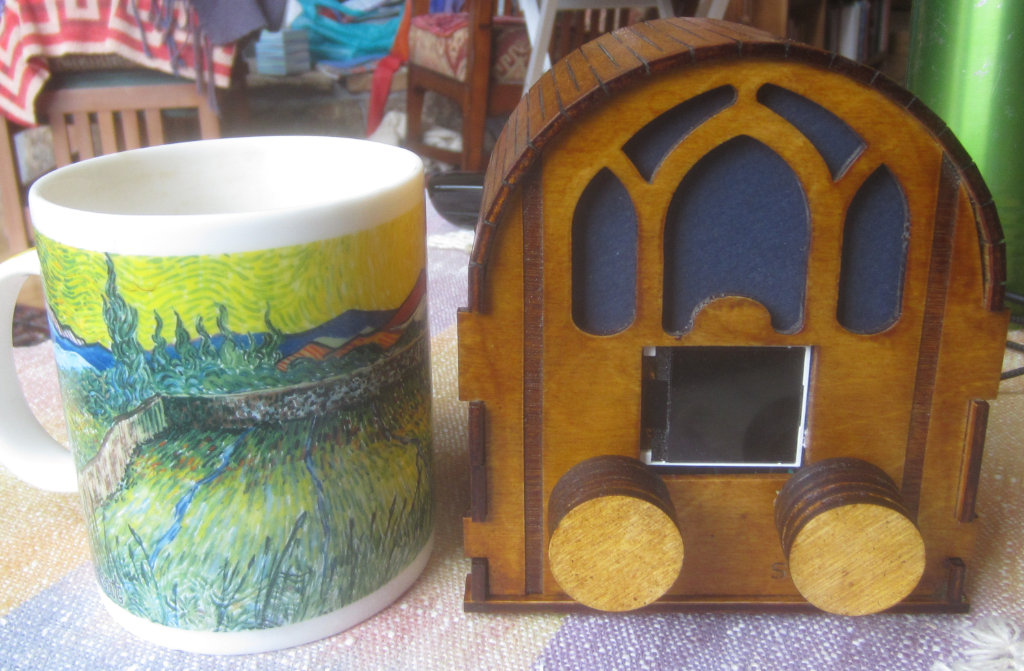 |
The finished cabinet measures approximately
4 1/2" wide, 5 1/2" tall and 3 1/4" deep. Its small
size is what makes it so cute. Here it is in relation to my rather large coffee cup. |
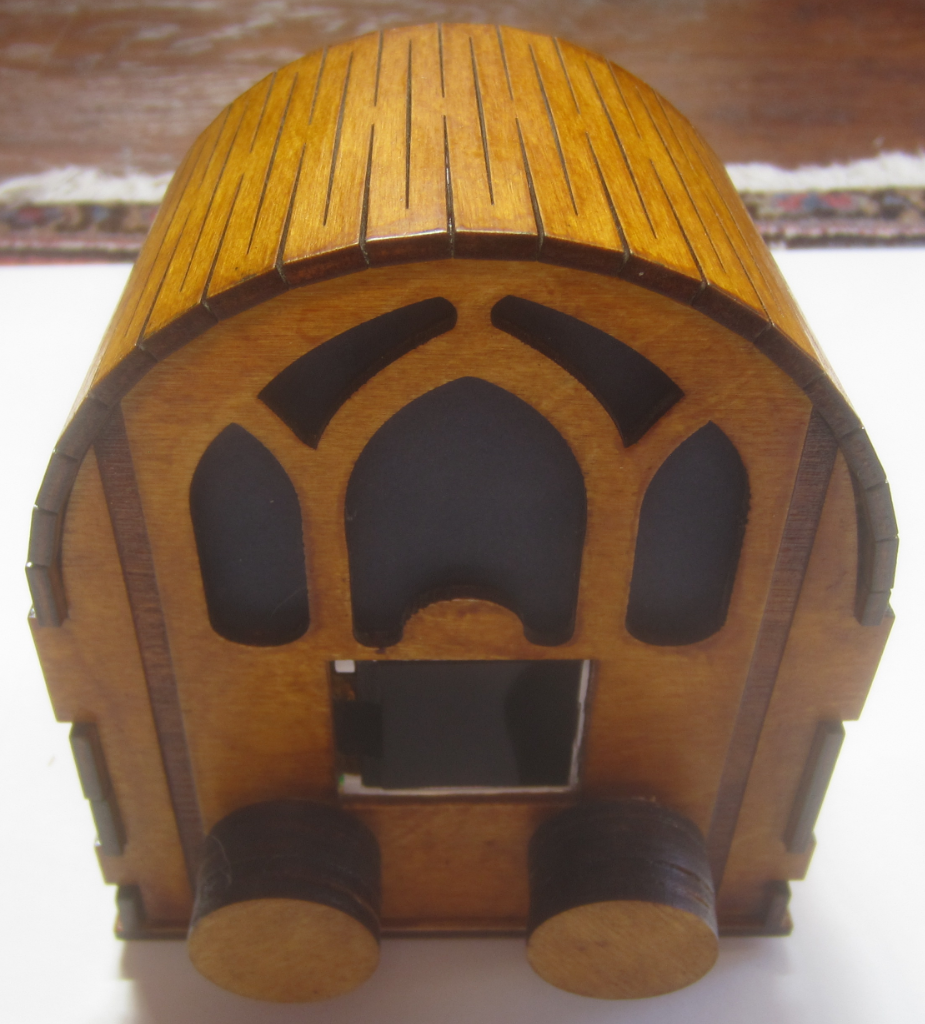 |
In this view you can see the live hinges
which allow the wood to be bent around the top of
the cabinet. You can also see that the knobs are made up of five layers of the Baltic Birch. The rotary encoders attached to the knobs each have a pushbutton switch so the knobs can not only be turned, they can be clicked. This opens up a lot of flexibility in controlling the music player. |
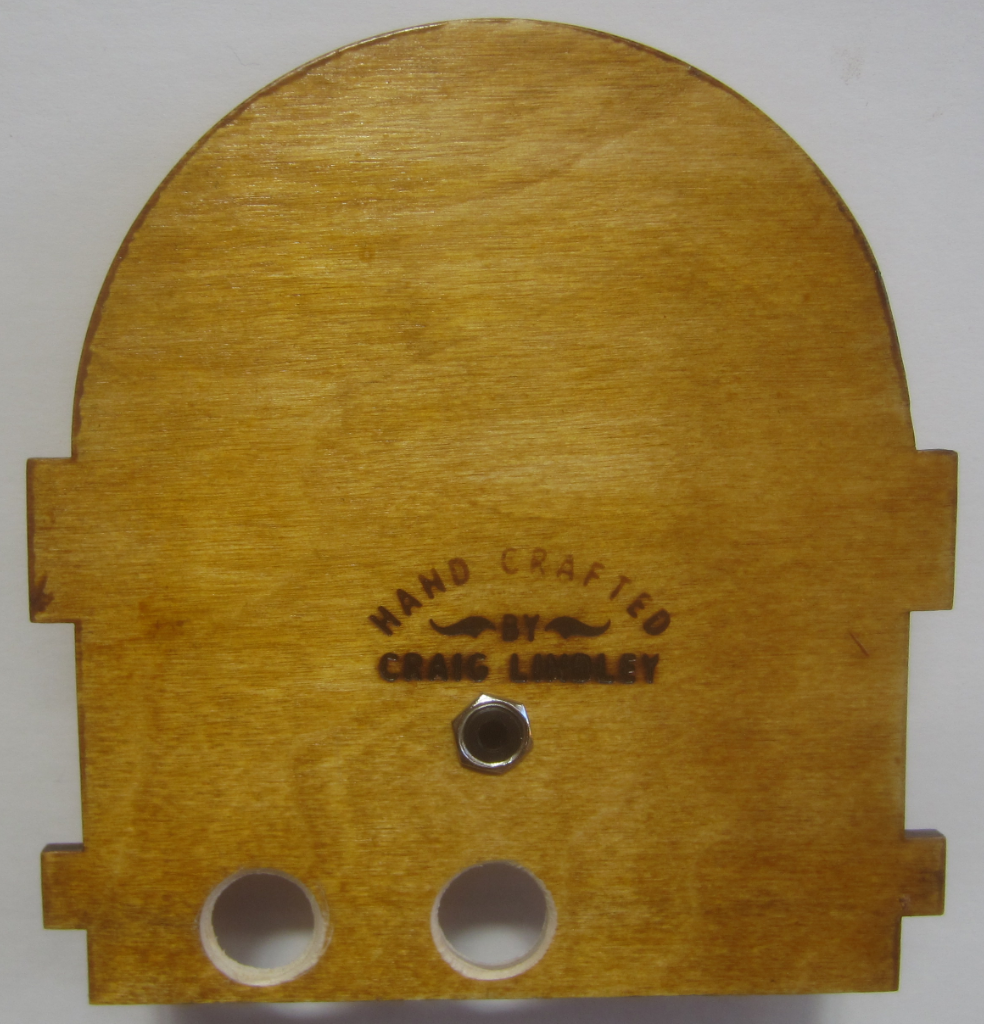 |
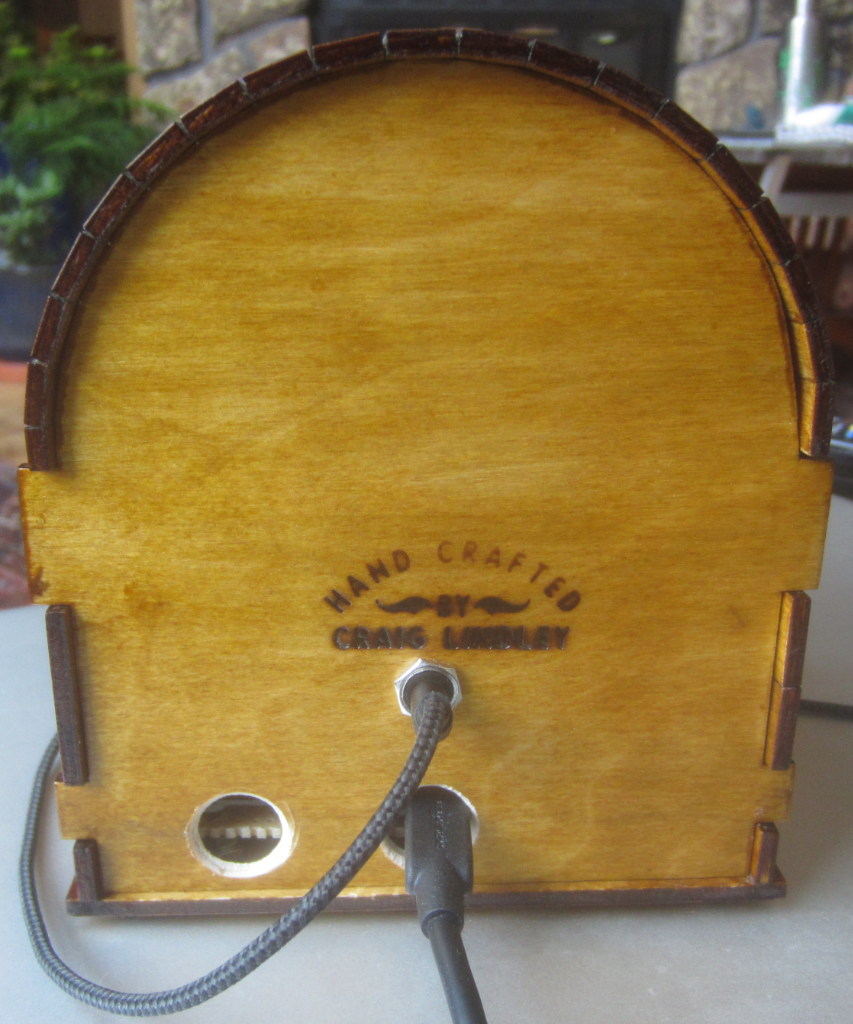
Here is the back of the cabinet branded
with my branding iron which didn't turn out so well.
Under the brand is the output jack. The large hole on the bottom left gives access to the SD memory card and the hole in the middle is for plugging in a USB cable for powering the unit. The back fits snuggly so there is no need for glue to hold it on. This is great for maintenance since I can get the back off and on easily if I have to. |
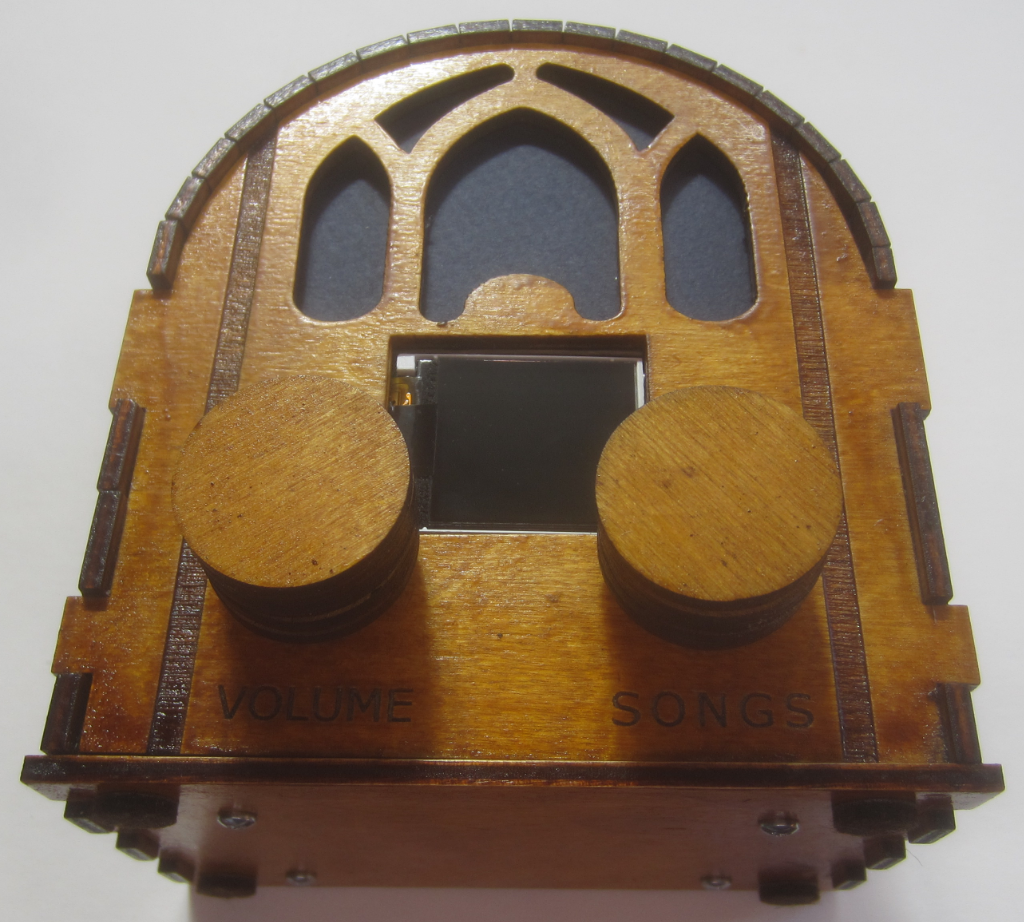 |
This view shows the engraved labels for the
controls: Volume and Songs. |
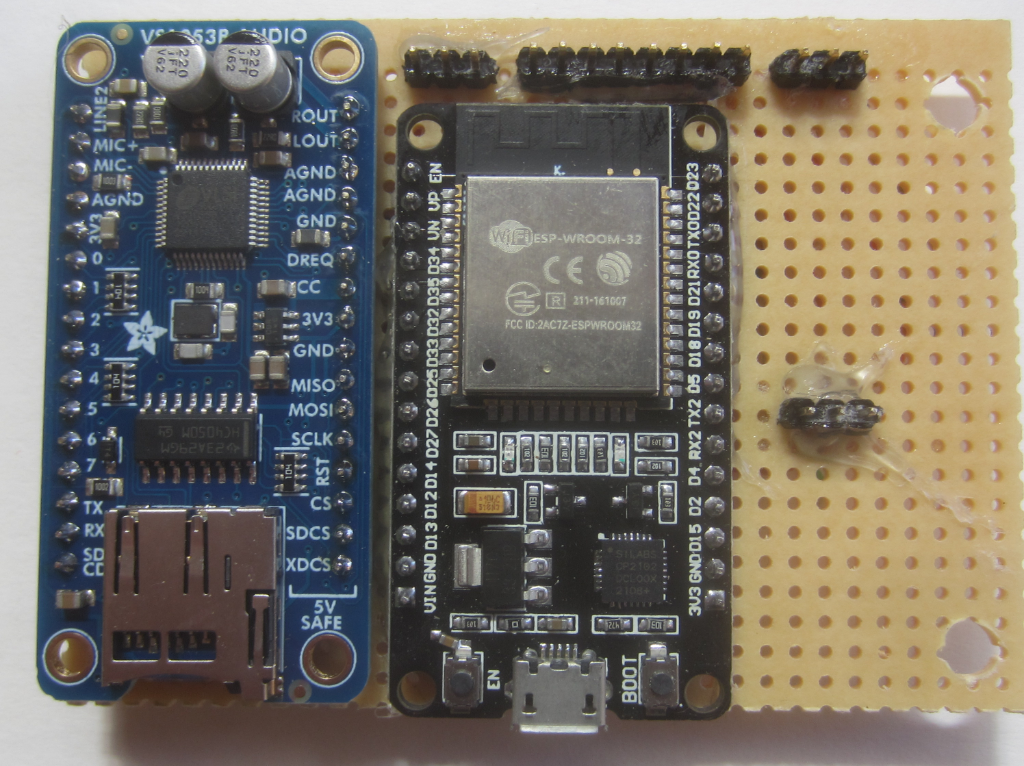 |
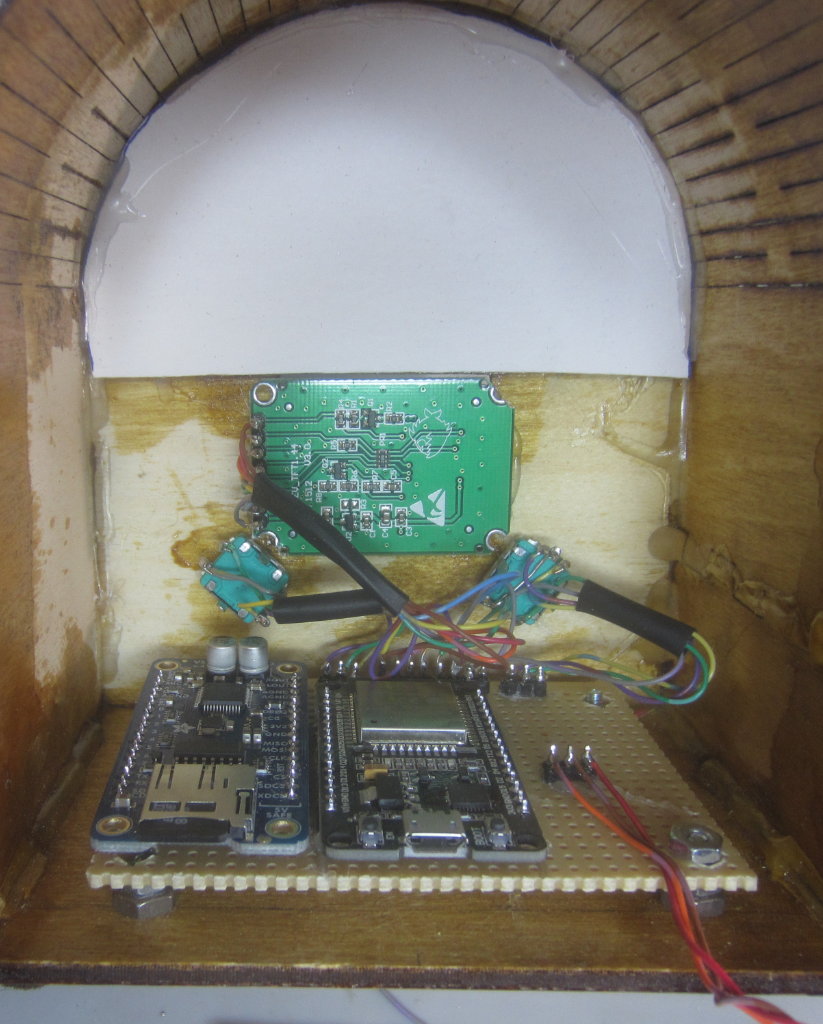
Here is the breadboard on which the
circuitry is built. The VS1053 module with SD card
interface is on the left and the ESP32 processor is
in the middle. The pin headers are for connection to
the components (the LCD display, the rotary encoders
and the audio output jack) not on the breadboard. As mentioned the music player is powered via a USB cable plugged onto the processor. |
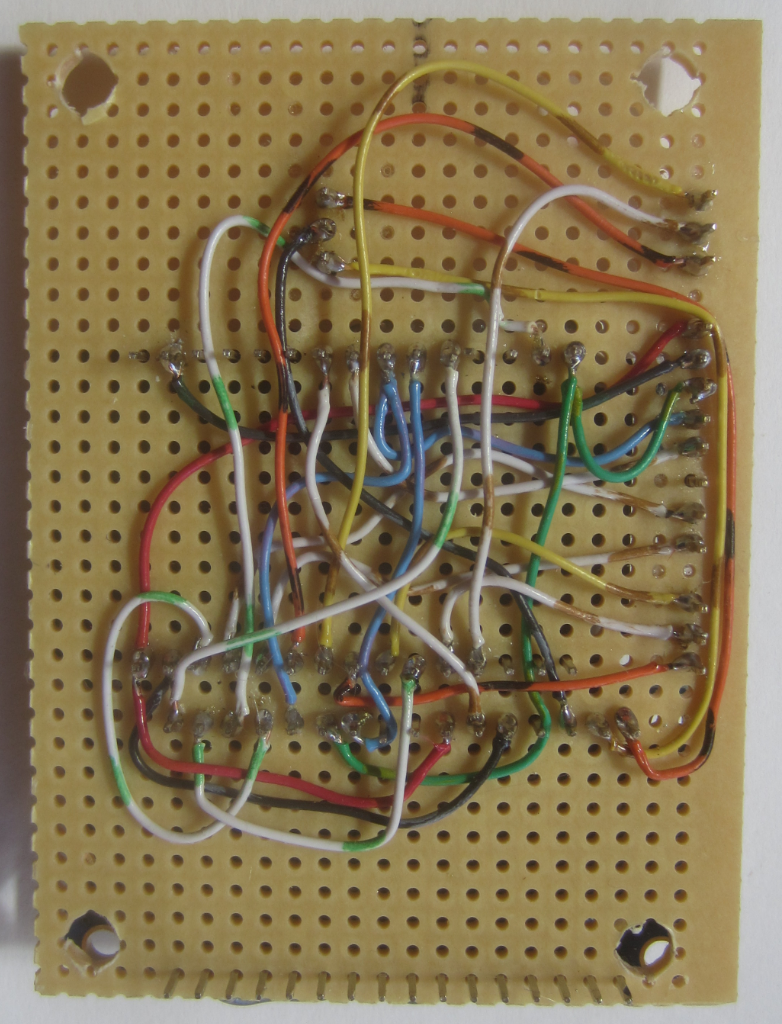 |
The rats nest wiring on the back of the
breadboard. All point to point. Connections shown
later. Since I only ever build one of my projects I never feel it is necessary to design and fabricate a printed circuit board. The holes in the corners of the breadboard are for securing it to the radio cabinet. |
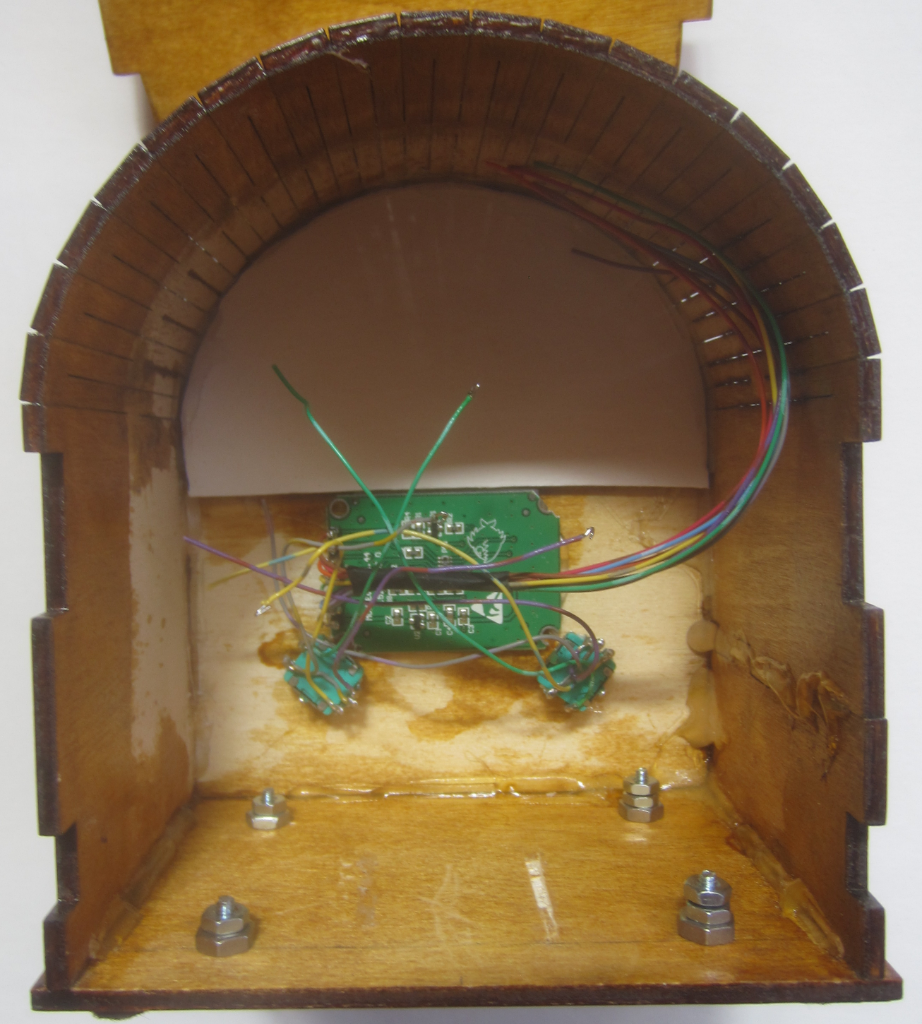 |
The ugly inside of the cabinet. The LCD
display is hot glued into its opening and the two
rotary encoders are mounted to the front of the
cabinet. The screws are for the support and securing
of the breadboard to the cabinet. I cut a piece of dark blue mat board to cover the holes in the front of the cabinet. I think it works well and is pleasing to look at. |
 |
All wired up. The next step was writing the software to make it do something besides look nice. |
 |
View of the radio cabinet's back with the
USB power cord and the headphones plugged in. |
 |
I decided to implement a Network Music
Player as proof the hardware worked as designed. The
final software has this functionality along with the
ability to play music off of a mini SD card and to
play Internet radio stations. The idea of the network music player is that it goes out to my web page which has all of my recorded music and makes all of my albums/CDs available for playback. With this application there is no local storage of any songs in the radio itself. Instead, the songs are streamed from my web site for playback. |
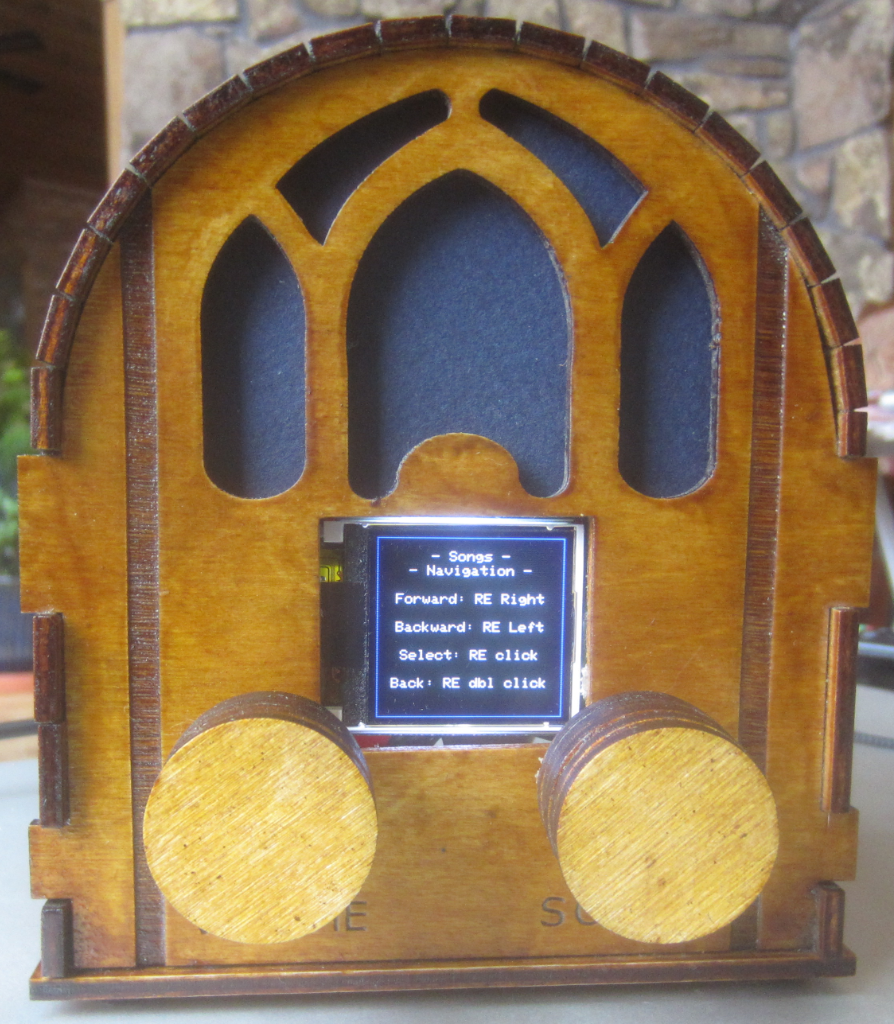 |
The screen shown here gives a user the
basics of song navigation. The Songs knob on the
right is a rotary encoder which can be turned in
either direction. Rotating it to the right selects
the next song; rotating it left selects the previous
song. The Volume knob on the left controls the volume of playback. The Songs knob can also be single, double or long clicked. To select something the knob is single clicked. To go back, the knob is double clicked. |
| ESP32 Signal |
ESP32 Pin |
MCUDEV_TFT1.44 LCD |
Volume Rotary Encoder |
Songs Rotary Encoder |
Adafruit
VS1053 Module #1381 |
| +5 |
+5 |
Vcc |
5.0V |
||
| GND |
GND |
GND |
GND |
GND |
GND |
| MOSI |
23 |
DI |
MOSI |
||
| MISO |
19 |
MISO |
|||
| SCLK |
18 |
SCK |
SCK |
||
| GPIO |
5 |
CS |
|||
| GPIO |
13 |
RST |
|||
| GPIO |
12 |
RS |
|||
| GPIO |
14 |
BL |
|||
| GPIO |
27 |
- |
|||
| GPIO |
26 |
+ |
|||
| GPIO |
15 |
SWITCH |
|||
| GPIO |
25 |
- |
|||
| GPIO |
33 |
+ |
|||
| GPIO |
4 |
SWITCH |
|||
| GPIO |
22 |
xCS |
|||
| GPIO |
21 |
xDCS |
|||
| GPIO |
32 |
SDCS |
|||
| GPIO |
17 |
DREQ |
NOTES:
These connections result in the rats nest wiring shown previously.
Almost every GPIO pin on the ESP32 is used.
On the rotary encoders, the GND connection is made to the center terminal and also to one side of the switch.
Antique Radio Part 2 - Software
Antique Radio Part 3 - Speakers
Questions and comments to me Craig at: calhjh@gmail.com